Kid friendly

Monster Pops

Those who know me, know that I’m not really a Halloween fan. Do I love adorable kid costumes? Yes. Do I like to be scared? No. If it were up to me we would just skip to Thanksgiving and have intermittent costume parties throughout the year. However, I do like to send in treats to my kids’ seasonal classroom parties. Usually, I like to follow the KISS method (Keep It Simple Stupid). My check list goes something like this, (in order of importance):

  1. Will it taste good?
  2. Is it cute?
  3. Is it realistically easy enough for me to do?

If it checks the criteria, it’s usually a no brainer- no need to keep digging.

Tada! I found these on Lilluna.com! (And you can get all of the details by clicking on the link.) So cute! So simple. I love that it’s not gory or scary… And who doesn’t love Rice Krispy Treats?  You can buy the melting candy already colored, and pre-packaged Krispy Treats. (Also, FYI it’s great for those peanut free classrooms!) This year I was in charge of the snack for both of my elementary schooler’s parties. So I get to use this twice! Bonus!

So, just in case you were looking for a last minute idea… This here, highly recommended! (I just wish I had thought of it…) 😉

Chocolate-Covered Strawberries

Happy Valentine’s Day! Today is the day we show our love… I love my husband… I love my kids… I love chocolate-covered strawberries! They are little, red, sweet, and fruity gifts wrapped in chocolate packages. The best part is, well, eating them. But the second best part is that they require very little skill. I don’t know if you’ve made them before, but I want you to know that it is so easy a four-year-old can do it.

As organic as possible:

2 pints (16-18) fresh Strawberries

1 bag (approx 11.5 oz.) Milk-Chocolate chips

1/2 bag (approx 6 oz.) Semi-Sweet Chocolate chips

1/2 bag (approx 6 oz.) White Chocolate chips (optional)

I know in a lot of professional dessert shops, they don’t rinse the strawberries. They actually use a soft brush and clean them like you would a mushroom. I understand the reasoning: you don’t want the extra moisture content to separate the berry from the chocolate. I get it. That said, I’m a little weird about not rinsing my fruit off.

I do use organic strawberries; which is important to me, not eating all of the toxic pesticides, not to mention GMO’s… But this is about Valentine’s Day -so let’s not go there! All I’m saying is that I rinse off my berries. Then pat them dry with a paper towel and let them sit until they are dry again. (I also realize that for someone who cares about the earth I use way too many paper towels.)

Now that we’ve got the dirty part out of the way, let’s get back to those clean berries. When they’re dry, all you need to do is melt your chocolate.


If you have a heavy bottomed saucepan, you could put the heat on low and let the chocolate slowly melt. However, it’s a more subtle and foolproof way to do the traditional double broiler method. Just put about an inch of water in the bottom of a sauce pan and set a glass bowl on the top (not touching the water) and set the heat on med-high letting the water come to a boil. Stir often until the chocolate is melted through, and no more chocolate lumps are visible. Carefully move the bowl to your work station (most likely the counter top).

Next, simply hold the berries by their green tips and dip and roll the fruit around in a chocolate bath until the berry is mostly covered with chocolate.

Let the excess drip off and then place them on a wax paper lined baking sheet.

It’s a simple as that, and you can totally stop there and eat your berries -and be happy. But my sweetheart happens to like white chocolate so I took it a step further and melted a little more goodness. This time because of the small amount, I microwaved the white chocolate chips in a microwave safe bowl for 30 seconds, then 15 second intervals, stirring in between, until the chocolate was smooth.

Because I am not a pastry shop I just used a Ziploc baggy with a hole cut in the corner for my drizzle.

Using a back and forth zigzag motion, draw the white lines across your chocolate-covered berries. Let the kids help, this doesn’t have to be perfection! (Unless you’re selling them, then you need to be meticulous… please refer to another blog.)

The work is done! Let the berries set for a while until the chocolate cools and hardens. If you have a refrigerator large (and sparse) enough to hold the trays… Lucky you! Just kidding. It can help the chocolate set faster.

And if you have a little extra chocolate that you don’t want to waste… Consider dipping in cookies, or graham crackers!

 Or of course, cleaning out the bowl yourself is always a viable option.

I hope your day is full of LOVE! (and chocolate)

Pizza Pasta

Who enjoys having fun with their food? I do! Let’s face it, I’m not in the running to win a Michelin star. Although I think I get 4 stars on this! (One from each of my kids). We have growing athletes in this house, so we eat a lot of pasta. And I don’t know one kid who doesn’t like pizza! Let’s just get crazy… As if we needed further proof that easy weeknight meals can be as amusing as they are tasty.

Serves 6-8

As organic as possible:

1 lb Penne pasta or pasta of choice

1 – 14 oz. jar/can or homemade Pizza sauce

1 – 15 oz. jar/can or homemade Tomato sauce

1 tsp Sugar

1 tsp dried Oregano

Salt and Pepper to taste

6 oz. Pepperoni, sliced *reserve 12-15 slices for topping, quarter the remaining

2 cups shredded Mozzarella or Italian cheese blend, divided

1/4 cup (approx) of freshly grated Parmesan

*Optional diced veggie “toppings”such as onion, green pepper, mushrooms, etc.

Preheat oven to 350°.

Cook pasta according to package instructions, less 1-2 minutes. *I like to salt my water when it comes to a boil, before adding dry pasta. Drain and return to pot.

In the meantime, in a sauce pan, combine pizza and tomato sauces, sugar (to balance tomato acidity), oregano,  quartered pepperonis, and any diced/sliced veggies. Stir until combined and warmed through. Taste for further seasoning, i.e. salt & pepper.

*Side note: this could easily be a vegetarian dish by omitting the meat! 😉

Pour the sauce mixture into the pot of noodles and stir. Place half of the saucy noodles in a large baking dish in an even layer. Sprinkle half of the shredded cheese on the first layer of noodles and repeat with remaining noodles and shredded cheese. Strategically place the full slices of pepperoni around the top of the pasta dish, followed by the grated Parmesan, to create your piece of art. Kiss your grouped finger tips and throw your hand in the air while shouting “Bellissimo!”

Place the loaded baking dish into the oven for 25-30 minutes, until the cheese is melted and the top pepperonis are starting to brown on the edges. Yum!

img_7320

*It might also be noted that I reserved some of the saucy noodles, which I placed in a separate small baking dish for my dairy-free son. (Which you may or may not need to do yourself.)


Isaiah’s Chocolate Dipped Peanut Butter Cookies

School’s out. So what do you do when your mom thinks she’s a home-ec teacher circa 1991 and you have a hankering for a chocolatey treat? You get out the measuring cups and mixing bowls so you can make yourself something awesome! I’m so proud of him, I’m beaming. And I’m eating some outstanding deliciousness. Chocolate and peanut butter are such a great combination. But don’t take it just from me, let’s hear Isaiah tell us about it: “They’re made with peanut butter, and they’re cookies.” (Cue the crickets)


Adapted from William-Sonoma’s The Cookbook for Kids

As organic as possible:

For Cookies

1/2 cup Butter

3/4 cup Brown sugar

1/4 cup Sugar

3/4 cup Chunky peanut butter

1 Egg

1/2 tsp Vanilla

1 1/4 cup Flour

1 tsp Baking soda

1/4 tsp Salt


For Chocolate Dip

1 1/4 cup Semisweet chocolate chips

1 Tbsp Vegetable shortening

IMG_5940


Preheat the oven to 350° F. Line 2 baking sheets with parchment paper. In a large bowl, beat the butter, brown sugar, granulated sugar, and peanut butter with an electric mixer on medium speed until blended. Add the egg and vanilla and beat until blended. Add the flour, baking soda, and salt and beat on low speed until blended.

Shape the dough into 1 1/2 inch balls, placing 12 balls at least 2 inches apart on each baking sheet. Using a fork, press twice into each cookie to make a crisscross pattern. Bake the cookies until golden, 8-10 minutes. Let the cookies cool on the pans for 5 minutes, then transfer to wire racks and let cool completely.

Meanwhile, add the chocolate chips to a microwave-safe bowl. Add the shortening. Microwave on high for 1 minute, stir. Then microwave for 30 seconds longer or until melted.

One at a time, dip half of each cookie into the melted chocolate, then place on a baking sheet lined with parchment paper. When all the cookies are dipped, place the baking sheet in the refrigerator just until the chocolate is set, about 5 minutes. Store the cookies in an airtight container at room temperature for up to 5 days.

Warning! This may attract on lookers.

IMG_5914

Another Warning! This is messy.

IMG_5935

But they’re worth it.

IMG_5931

Entertaining the Kids with English Chocolate Crisps

By now we have established that I am a stay at home mom of four. So it fair to presume that most of my entertaining is for my children. Keeping them active in the kitchen is important to me. (Okay, to be completely honest sometimes I want them away from the kitchen). But mostly I want to teach them about food and preparing it. I want them to see ingredients and learn where they come from. I often talk to them about eating organic and try to explain (age appropriate) reasons why. For convenience sake we do buy packaged food (I don’t know the first thing about making chocolate), but we try to make good choices.

472

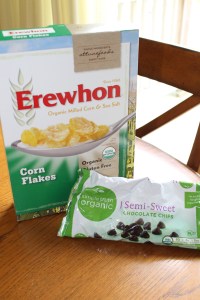
The Barefoot Contessa cookbook, Make It Ahead, has a great recipe to try with your children. There is no baking involved (only melting some chocolate on the stove top, done by mom). There are only for ingredients: milk chocolate, bittersweet chocolate (I used semi-sweet, pictured), cornflakes and cranberries, and the whole process is basically stirring and dropping spoonfuls of the mix onto paper. Perfect for my two and four year old!

475

They like being a part of the creating process and they l-o-v-e taking ownership of the final product! Such an accomplishment! Since there were no eggs involved, eating the batter was an option… and that’s always a good reward along the way.

482

480

483

The result was quality time with mom, happy kids and fun treats to eat. I encourage you to spend some time with the kids in your life, “it’s the best investment you’ll ever make!”

513

It’s also a rule of mine to try a recipe as it is written for the first time, before I tweak it. And these cookies were delicious. But I think next time we will make them a little more kid-friendly and fun (and subsequently less healthy) by substituting the cranberries with mini-marshmallows!