treats

Life Bellissima’s Peanut Butter Fudge

I’ve only attempted fudge a few times in my life- and not very successfully. It seems like it should just be something in one’s repertoire. Like every homemaker makes fudge, at least in my mind. Once I even tried making a sugar-free fudge for my diabetic grandmother, which was a disaster. I live hours away from Mackinac Island, where they produce world famous and delicious fudge. It’s just like one of those things that has been a part of my life all of my life. Making good fudge is important! Is it a Michigan thing? Is any of this making sense?

Then came Anna of Life Bellissima. She shared a Peanut Butter Fudge recipe that was special to her, because it’s the same recipe her dad used to make. And I thought to myself, “I’m going to try again.” And I can now feel comfortable saying that I do make fudge- good fudge, successfully (at least one kind of it). I have my own family recipe! My husband and kids loved it, and my kids had fun helping me make it.

img_6500
My favorite tip was that Anna said to pour it onto a plate! My first reaction was no way, it’s going to go everywhere and make a hot mess! But, mind you, I’ve never been successful at fudge making. And I thought about the times I’ve tried to dig it out of a baking dish… or try to prep a dish with wax paper. And I trust Anna, and if she said that’s how she does it, then by golly that’s how I’ll do it! I dumped that hot peanut butter fudge right onto a large (buttered) dinner plate, and it worked!


Without further ado, straight from Life Bellissima:

Sue’s Easy 15-Minute Peanut Butter Fudge

*I prefer to use organic ingredients

-In medium saucepan, combine:

1 cup raw cane sugar

1 cup light brown sugar

1/4 teaspoon salt

1/2 cup milk

-Stir with a wooden spoon until mixture begins to softly boil. Cook to 240 degrees. (For some reason, mine tends to heat fairly quickly, and I take it off of the burner at 230 degrees.)

-Remove from heat, and add:

1 cup mini marshmallows (or homemade marshmallow recipe here)

1/2 cup peanut butter

1 teaspoon vanilla

-Mix with a wooden spoon for several minutes. Candy will become creamy, thicken and start to lose it’s gloss.

-Spread onto a buttered dish (Dad and I always used a large dinner plate.)

-This recipe can easily be doubled.

Thank you Anna for a great new recipe!

And I’ve had a request for Life Bellissima’s Homemade Marshmallow recipe too. Which she got from www.kitchenfrau.com, who got the no-fail recipe from her mother-in-law, Mabel’s cookbook. Don’t you just love modern conveniences? She includes some great step-by-step photos too. (Just click on the website above!)


Crockpot Toffee Nut Clusters

When I think about what I like in a candy, it usually involves chocolate and nuts, chewy and crunchy, sweet and salty. I also really love toffee. Lucky for me there is really not much I don’t like. And even luckier for me, these little clusters of goodness have it all! Recently I shared with you about my cousin Charlotte. Thankfully she shared this recipe with me! It really couldn’t get much easier either. It makes a lot of these chocolatey and nutty packages, so it’s great for giving as gifts or sharing at the office. And not to worry, if there are still leftovers… they freeze well too. Enjoy!

2 small jars (16 oz each) dry roasted peanuts (1 salted, 1 unsalted)

3 lbs or blocks of white almond bark, vanilla Candiquick or vanilla candy coating, chopped into small pieces

1/2 lb Bakers semi-sweet chocolate, chopped into small pieces

1 bag Heath chips

1 bag Milk chocolate chips

1 bag Semi sweet chocolate chips

*Also a full size crockpot, a sturdy spoon and a strong arm 😉

Put everything in the crockpot on low. Stir often. When all is melted and no more dashes of white or dark spots of chocolate can be seen (about an hour), spoon in globs on wax or parchment paper until it hardens (a couple more hours).

image

And you get to feel like a chocolatier, so that’s cool.

It makes a vat full, so be prepared to share or freeze the clusters and bring them out in batches. They will last a few months in the freezer.

Entertaining the Kids with English Chocolate Crisps

By now we have established that I am a stay at home mom of four. So it fair to presume that most of my entertaining is for my children. Keeping them active in the kitchen is important to me. (Okay, to be completely honest sometimes I want them away from the kitchen). But mostly I want to teach them about food and preparing it. I want them to see ingredients and learn where they come from. I often talk to them about eating organic and try to explain (age appropriate) reasons why. For convenience sake we do buy packaged food (I don’t know the first thing about making chocolate), but we try to make good choices.

472

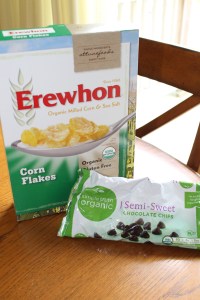
The Barefoot Contessa cookbook, Make It Ahead, has a great recipe to try with your children. There is no baking involved (only melting some chocolate on the stove top, done by mom). There are only for ingredients: milk chocolate, bittersweet chocolate (I used semi-sweet, pictured), cornflakes and cranberries, and the whole process is basically stirring and dropping spoonfuls of the mix onto paper. Perfect for my two and four year old!

475

They like being a part of the creating process and they l-o-v-e taking ownership of the final product! Such an accomplishment! Since there were no eggs involved, eating the batter was an option… and that’s always a good reward along the way.

482

480

483

The result was quality time with mom, happy kids and fun treats to eat. I encourage you to spend some time with the kids in your life, “it’s the best investment you’ll ever make!”

513

It’s also a rule of mine to try a recipe as it is written for the first time, before I tweak it. And these cookies were delicious. But I think next time we will make them a little more kid-friendly and fun (and subsequently less healthy) by substituting the cranberries with mini-marshmallows!