dessert

Pannu Kakku

I remember the first time I ate this growing up. The name sounded so exotic. My mother had learned the Finnish oven baked pancake recipe from a close family friend. The dish was served warm and topped with syrup. It was sweet and comforting. And although all of the ingredients were familiar to me, the almost soufflé like appearance and custard like texture turned this into something completely different and very special. The ratio of milk to eggs and sugar varies based on personal preference, this is how we like it the most.

As organic as possible:

1 stick Butter

1 cup Flour

4 Eggs

1 cup Milk

1/2 cup Sugar

1 Tbsp Vanilla

Preheat the oven to 400°. Melt the butter in a 13 x 9 inch pan until bubbly and starting to brown. In the mean time, add eggs, milk, vanilla and sugar to flour. Mix until all is incorporated. When butter is ready remove pan from oven and turn down to 375°. Carefully swirl the butter around the pan to cover bottom and sides. Pour batter into the pan and bake 25-30 minutes, until center is set (not runny). Serve warm with syrup or fruit.

Maple Pecan Pie

I love pecan pie. It’s sweet and sticky, nutty and buttery. My grandma used to make one, in which she would over-bake until it was hard but still chewy and tasted like candy. It’s the only dessert I remember her making. I wish I knew how to replicate that pie! However, years of practice has left me with this family favorite. And I have tasted and made A LOT of pecan pies. In fact, one time I even made about 5 or 6 and had a taste off for family and friends! This was the clear winner. I love that it incorporates the maple syrup in the flavor! It’s honestly one of the most simple pies to make. From my table to yours, I hope you enjoy!

As organic as possible:

2 Eggs

1/2 cup Sugar

1/4 cup Brown sugar

3/4 cup Maple syrup

1/4 cup light Corn syrup

3 Tbsp Butter, melted

1/2 tsp Vanilla

1/4 tsp salt

1 1/2 cups Pecan halves

1 unbaked pie crust (I use Martha Stewart’s Paté Brisée)

Preheat the oven to 375º.

If making your own pie crust, place the dough into pie plate. I reserve a little left over dough to press out Maple leaves, for the “Maple” Pecan pie.

In a large mixing bowl whisk eggs and sugars until creamy. Add syrups, butter, vanilla, salt and mix. Add pecans and stir until incorporated. Pour into pie shell and bake 30 minutes. I use the remnant from the melted butter dish (from the pie filling) to lightly coat the top of the maple leaves. Quickly, place the dough maple leaves in any artistic formation you would like on top of the pie and continue to bake 15-20 minutes, until the center of the pie is set when slightly shaken (not completely unmoving, but not liquid-y). Pie will continue to set while it cools. Allow to cool and set before serving. (It’s a great recipe to make a day ahead!)

Tip: It making the pie ahead of time, do not cover with plastic wrap, it can make it “soggy.” Instead use wax paper or aluminum foil.

Easy Honey Cake from Natascha’s Palace

My blogging friend Natascha from Natascha’s Palace currently resides in Spain. I am envious of her cookbook collection and I enjoy how she incorporates what she is currently reading into her posts. From Julia Child to Monet, she has a fascinating way of bringing their recipes to life; all the while sharing her personal journey as a teacher, traveler, and wife… Thank you Natascha, your blog is a joy!

I love that the recipe called for “de miel” (honey), I feel so cultured! And I love that Natascha used a beautiful flower, (I tried to emulate her pic, but I am not sure my flower is edible). Aside from the beating the egg whites until stiff (because sometimes I can be lazy)… this was such an easy and delicious recipe! The aroma really made me love the smell of my kitchen and being that the mornings and evenings are getting quite chilly, it was lovely to finally have something baking in the oven! The honey drizzled on the top of this cake really kept it moist. And the hint of cinnamon in every bite was just enough to give a little depth. I really enjoyed this cake (as well as my friends and family) and it seemed like such a perfect dessert to add other ingredients. I thought “wouldn’t it be fun to throw in some pieces of chopped apple?” I’m getting excited just thinking about it. Baking season is here!

Thankfully Owen fulfilled my Christmas request a couple years ago and bought me a food scale from Sharper Image, because the measurements are in grams, not cups. Which for whatever reason I couldn’t get a clear translation on, so I got precise and weighed it out. I have included my dry ingredient measurements for you! My liquid measuring cup has ml’s on one side, phew! For the original recipe visit Natascha’s Palace!

As organic as possible (my input)

120 ml honey, plus more for topping

3 large eggs, separated yolks and whites

2 Tbsp sugar

150 ml milk

120 ml olive oil

1/2 tsp cinnamon

1 1/2 cups plus 3 Tbsp flour

1 Tbsp (rounded) baking powder

Confectioners sugar for topping (optional)

Preheat oven to 350º. Grease a cake 9″ round cake pan, set aside.

Heat the honey in a small pot until it is liquid-y, remove from heat and pour into a mixing bowl. Beat the egg yolks and sugar into the honey, add the milk, cinnamon and oil, mix well. Sift flour and baking soda in a large bowl, add the wet ingredients and combine. In a separate small bowl, beat the egg whites until stiff. Fold them into the flour mixture until just incorporated. Pour the batter into the prepared cake pan and bake for about 30 minutes until an inserted toothpick comes out clean. Let cool about 10 minutes and remove from pan onto a cooling rack. When cooled completely sprinkle with confectioners sugar and drizzle with honey. Enjoy!

image

Double Chocolate-Almond Biscotti

I can eat biscotti all day without guilt. Maybe because its called biscotti (Italian for a twice baked cookie), it doesn’t register. I think I’ve tried it all. There hasn’t been one variation I didn’t like. Besides, that second round in the oven probably got rid of anything bad for me, right?

As organic as possible:

1/2 cup Butter, softened

3/4 cup Sugar (rounded)

1 tsp Almond extract

1/4 cup Cocoa powder

2 tsp Baking powder

1/8 tsp salt

2 Eggs

1 3/4 cup Flour

1/2 cup Milk Chocolate chips or pieces

1 cup Semi-sweet Chocolate chips or pieces

1 cup Sliced, slivered, or chopped almonds

Preheat oven to 375º. Lightly grease a cookie sheet, set aside. In a stand-up electric mixer or in a large mixing bowl with an electric mixer or with your mighty hand, beat butter, sugar and almond extract. Add cocoa powder, baking powder and salt, mix. Scrape down the sides of the bowl and add eggs, one at a time. Add flour, a third at a time, until combined. Remove bowl from mixer. Add milk chocolate, semi-sweet chocolate and almond pieces, gently fold until incorporated.

Separate dough into to halves. Taking one half of the dough portion into your hands, shape into a log about 9″ long. Place onto the baking sheet lengthwise and gently press down to lightly flatten. Repeat with the other half. Place into the oven and bake 20-25 minutes, until a toothpick inserted into the center comes out clean. Remove from oven and let cool for 1 hour.

Preheat the oven to 325º. Place cookie loaf onto a cutting board and cut diagonally with a serrated knife. Place cut side down and bake for 8-9 minutes. Turn the cookies over and bake for an additional 8-9 minutes, until crisp. Let cool. Serve with coffee or hot cocoa for dipping or all alone.

Best Cookie Bars Ever

You are probably familiar with cookie bars, from Magic to 7 layer. I don’t discriminate against cookie bars, I love them all. They are my fall back, go to, SOP (Standard Operating Procedure; my husband is an engineer) for every event all year round. For my very knit close group of friends, who get together regularly, we often bring a dish to impromptu gatherings. I go straight to the cookie bars. They never let me down.

As organic as possible:

1/2 cup (1 stick) Butter

9 Graham crackers, full sheets (I like Annie’s Organic)

14 oz Sweetened condensed milk (1 can or Trader Joe’s organic bottle)

1/2 cup Crunchy peanut butter

1 tsp Vanilla

1/2 cup Coconut

1 cup Chocolate chips

1 cup Chopped hazelnuts

Okay, here’s the drill. Preheat the oven to 325º for a glass pan, 350º for metal. In a ziplock or mortar and pestle type set up, smash the graham crackers until fine crumbs. Place the stick of butter in a 13X9 baking dish and let melt in the oven. Continue to leave in the oven a couple more minutes until browned (not burned). In the mean time, in a sauce pan over medium-low heat, warm condensed milk, peanut butter and vanilla just until smooth. Remove from heat. When butter is a little browned and bubbly, (using oven safe gloves or hot pads) remove the dish from the oven and move around, letting melted butter coat the whole bottom of the pan. Add the crumbs to the butter making an even layer. Press down gently using your hands or the bottom of a glass. Pour condensed milk mixture over the graham cracker crust and gently smooth to make it even. Sprinkle the coconut flakes over the milky peanut butter. Scatter the chocolate chips evenly over the coconut. Sprinkle chopped nuts on the top of the chocolate. Carefully pat the toppings down. Bake 25 minutes, until lightly browned. Let cool, cut into squares and serve.

Tip #1 Use good ingredients! I love Annie’s Organic Graham Crackers, they are sweet and perfect all by themselves.

Tip #2 Use Salted Butter! For this recipe, a salty bite on the crust is what you need.

Tip #3 Brown your butter! It just adds that je ne sais quoi.

Tip #4 Use crunchy peanut butter! We are building layers of texture and flavor here, it all matters.

Tip #5 A little coconut goes along way. Too much does not make it better in this case!

Tip #6 Use milk chocolate! Everybody likes milk chocolate.

Tip #7 Hazelnuts have a great crunch! (chopped peanuts are the next best thing) And great bars have crunch.

Tip #8 Layer bars are best served at room temperature. It allows all of the flavors to shine.

Tip #9 Share! Because something this good should be had by all.

White Chocolate-Cranberry Oatmeal Cookies

I am crazy about these cookies. Simply put they are just really good. It’s everything I want in a cookie; sweet, chewy and loaded with flavor in every bite. They are like perfect. And because they have oats, cranberries, and walnuts (and white chocolate chips- but just mumble that under your breath) I feel good about eating them for breakfast. Or in between meals. Or after lunch. and dinner.

As organic as possible:

3/4 cup Butter, softened

1 cup packed Brown sugar

1/2 cup Sugar

1 tsp Baking powder

1/4 tsp Baking soda

1/2 tsp Cinnamon

2 Eggs

1 tsp Vanilla

1 3/4 cups Flour

2 cups Oats

1 cup White chocolate chips

1 cup Cranberries

3/4 cup chopped Walnuts

Preheat the oven to 375º. Beat butter by hand or with electric mixer until creamy. Add sugars, baking powder, baking soda and cinnamon and continue to beat until creamy, light and fluffy (scraping the sides as necessary). Beat in eggs, one at a time, and vanilla. Mix in the flour (I like to do this 1 cup and 3/4 cup at a time). Stir in oats. Batter will be getting thick! Fold in white chocolate chips, cranberries and nuts until all are evenly incorporated.

I have said it in the past, we like our cookies big. So I use an ice cream scoop, but you can use smaller spoons if you’d like. Drop the cookies onto an un-greased cookie sheet (leaving space for growth in between). Bake for about 8-10 minutes, until edges are turning brown and center is soft (not wet). Allow to cool for a minute before transferring to a cooling rack.

*I adapted (dare I say perfected) this recipe many moons ago from a Better Homes and Gardens oatmeal cookie recipe. And you may take any liberties you’d like with substituting ingredients because this recipe is flexible, but if I were you I’d try it like this at least once.

Entertaining the Kids with English Chocolate Crisps

By now we have established that I am a stay at home mom of four. So it fair to presume that most of my entertaining is for my children. Keeping them active in the kitchen is important to me. (Okay, to be completely honest sometimes I want them away from the kitchen). But mostly I want to teach them about food and preparing it. I want them to see ingredients and learn where they come from. I often talk to them about eating organic and try to explain (age appropriate) reasons why. For convenience sake we do buy packaged food (I don’t know the first thing about making chocolate), but we try to make good choices.

472

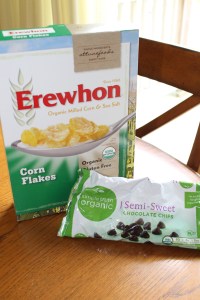
The Barefoot Contessa cookbook, Make It Ahead, has a great recipe to try with your children. There is no baking involved (only melting some chocolate on the stove top, done by mom). There are only for ingredients: milk chocolate, bittersweet chocolate (I used semi-sweet, pictured), cornflakes and cranberries, and the whole process is basically stirring and dropping spoonfuls of the mix onto paper. Perfect for my two and four year old!

475

They like being a part of the creating process and they l-o-v-e taking ownership of the final product! Such an accomplishment! Since there were no eggs involved, eating the batter was an option… and that’s always a good reward along the way.

482

480

483

The result was quality time with mom, happy kids and fun treats to eat. I encourage you to spend some time with the kids in your life, “it’s the best investment you’ll ever make!”

513

It’s also a rule of mine to try a recipe as it is written for the first time, before I tweak it. And these cookies were delicious. But I think next time we will make them a little more kid-friendly and fun (and subsequently less healthy) by substituting the cranberries with mini-marshmallows!

Lemon Bread

I appreciate the sour note of a lemon, especially in something sweet. This bread is great in the morning for breakfast, it works as a dessert, and can be served on the side of a salad. But my favorite way to eat this treat is in the afternoon with a cup of coffee (or tea for my English friends). It’s the perfect little bright pick-me-up.

Makes 1 Loaf

As organic as possible:

1/2 cup (1 stick) butter, softened

1 1/2 cup sugar

2 eggs, beaten

1/2 tsp vanilla

1 Tbsp lemon zest

1 1/2 cup flour

1 tsp baking powder

1/2 tsp salt

1/2 cup milk

Glaze:

1 cup powdered sugar

3 Tbsp freshly squeezed lemon juice

Topping:

1 Tbsp lemon zest

2 pinches sugar

Preheat the oven to 350 degrees. Grease (or spray) a loaf pan and set aside. Beat the butter with an electric mixer (or your strong arms and a utensil) until creamy. Add the half the sugar and beat into the butter, then add the other half of the sugar and beat until light and fluffy. Add the eggs, vanilla, and zest, mix until blended. In a separate bowl whisk the flour, baking powder and salt. Alternate adding the dry ingredients and the milk into the butter mixture. Pour the mixture into the loaf pan and bake 50-55 minutes, until a toothpick inserted into the center comes out clean.

Allow to cool slightly while you prepare the glaze. Place the powdered sugar and lemon juice into a bowl and stir until it makes a thick, sticky, yummy liquid. Remove the loaf from the pan and place it on the serve ware of your choice. Spoon the glaze onto the loaf, allowing it to flow down the sides like lava out of a volcano (just the flow part, not the fire or sputtering).

Before the glaze dries sprinkle the zest and pinches of sugar evenly across the top. Serve at will.

Chocolate Chip Cookies

Chocolate chip cookies are like the king of all cookies. I mean there are a lot of really good cookies out there, but I think they all are held to a standard: “is it better than a chocolate chip?” Ask a kid what there favorite cookie is; I bet nine times out of ten it’s a chocolate chip. Needless to say, you’ve got to have a chocolate chip recipe in your repertoire.

Makes 22-24 using a 2″ cookie scoop (ice cream scoops work too!)

As organic as possible:

1/2 cup shortening

1/2 cup (1 stick) butter, softened

1 cup packed brown sugar

1/2 cup (rounded) sugar

1/2 tsp baking soda

1/2 tsp salt

2 eggs beaten

1 1/2 tsp vanilla

2 1/4 cups flour

1 10 oz bag large chocolate chips (I <3 Simple Truth organic) or 2 cups regular choc chips

Preheat oven to 375. Beat shortening and butter in a large bowl with electric mixer (or old-fashioned muscle power works too). Add brown sugar, sugar, baking soda and salt. Beat mixture until combined, scraping sides as needed. Mix in eggs and vanilla. Add flour scoops at a time. If too much for a machine, finish mixing by hand until all flour is incorporated. Fold in chocolate chips. Drop cookies onto a baking sheet leaving about 2″ of space in between globs for room to spread. We like large cookies! So to accommodate our cookie love we use a large scoop, but smaller scoops work too; just lessen your baking time. For large cookies, bake about 12-14 minutes, until edges are just starting to brown and the center is still soft.

IMG_7021

Baking cookies is easy! And it’s fun to do with your kids!  It’s pretty hard to mess up (unless you forget them in the oven).

The Chef’s Creme Brulee

Creme Brulee is Owen’s all time favorite dessert. And I can’t argue with fabulous. It’s sweet, it’s creamy, it’s got a little sugary crunch… I could probably eat it on a regular basis. And despite its sophistication, it is actually not difficult to make. This recipe is from The Chef (aka my sister); if I can do it, you can do it.

Makes 7-9

2 cups heavy cream

1 cup milk, divided

1/2 vanilla bean

6 egg yolks

1/2 cup sugar

Strawberries and blueberries for topping (optional)

Preheat the oven to 325 degrees. In a mixing bowl combine 1/2 cup milk, sugar and egg yolks. Set aside. Cut the vanilla bean in half (down the center) and scrape the seeds our of the bean pod with the point of the knife. Combine the vanilla beans, the vanilla pod, cream and the remaining 1/2 cup milk in a saucepan. Bring to a roiling boil. Remove boiling cream mixture from heat and temper with egg yolk mixture, whisking constantly (To temper: Add a little of the boiling mixture, whisking all the while, to egg mixture to get it to avoid curdling before adding the rest.) Return tempered mixture to the saucepan and continue cooking 1 more minute. Remove from heat and strain using a fine mesh sieve. Pour cream mixture evenly into the ramekins. Bake in a water bath (place ramekins in a baking dish with sides and surround them with water about half way up the sides of the ramekins) until a toothpick inserted comes out clean, and center is almost set, about 30 – 45 minutes.

Let the cream cool before spreading a thin, even layer of sugar on the top. Using a torch, evenly flame the sugar until brown and bubbly; creating a crust (brulee) on the top of your cream (creme).

Side note: I am also aware of people scorching their sugar in the oven, with a broiler. (But I have no experience with that.)

Place sliced strawberries and fresh blueberries on the top before serving if desired. Congratulations! Now you get to eat!

Another Side note: These can be made in advance. You can chill the desserts in the refrigerator ahead of time until ready to serve.